

 Back
 Русский
 Английский
Nov 2, 2026
How to Stream GTA VI on PS5: Get Ready for Launch
GTA VI launch night is a chance to discover a new game world with your viewers: the first drive, the first mission, the moments nobody saw coming. Spending the opening half hour fixing a silent microphone would be a frustrating way to start.
The setting spans the state of Leonida, including Vice City and other locations. As of November 2, GTA VI is scheduled to launch on PS5 on November 19, 2026. If you plan to play on PS5, connect your channel and rehearse the setup before launch night.
You can start with the console alone. For custom scenes, a webcam or several streaming destinations, bring the gameplay into OBS with a capture card. Here is how to set up either option.
Pick the setup that fits your stream
For a playthrough with Twitch chat, the PS5’s built-in broadcast tools are a good place to begin. If your plans include a starting screen, a webcam scene and the same playthrough on Twitch and YouTube, build the stream in OBS.
| Your plan | Directly from PS5 | Capture card and OBS |
|---|---|---|
| Go live on Twitch or YouTube | Link your account and start broadcasting | Set up capture on the computer first |
| Add a layout | Use the console’s built-in options | Build your own scenes, webcam and starting screen |
| Control the audio | Adjust microphone and party audio on PS5 | Mix game and mic separately when they arrive as separate sources |
| Reach several platforms | Choose one service when starting the broadcast | Send one OBS stream to StreamVi and enable your destinations |
You do not have to buy a capture card for your first stream. Try the direct route first; it may be all your playthrough needs.
Stream from PS5 without a PC
Start with your channel. YouTube’s first live-stream activation can take up to 24 hours, so do that before launch night. Then link Twitch or YouTube to PlayStation using Sony’s account-linking guide.
- Open a game, press the DualSense create button and select Broadcast.
- Choose Twitch or YouTube, check the account and enter your stream title.
- In Broadcast Options, include your mic. If friends are joining, include party audio and let them know their voices will be on stream. They will also need to allow voice sharing.
- Select Go Live. The broadcast card in the control center lets you pause or stop the session.
Find video quality under Settings → Captures and Broadcasts → Broadcasts, along with audio options. Available resolutions depend on the service. Sony’s Broadcast guide covers these controls.
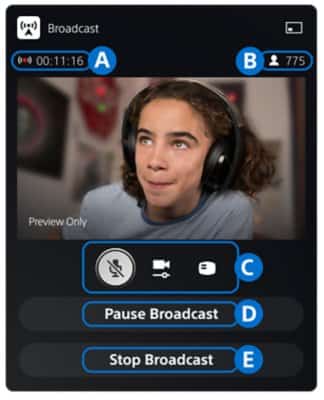
The broadcast card shown in PlayStation Support.
Open the stream on your phone and watch a little movement. If it freezes or breaks up, lower the quality and try again. The game can look great on your TV while viewers receive a struggling stream.
Say a few sentences at your normal commentary volume. Make sure PS5 has the right mic selected and it is unmuted. Use headphones so the microphone does not pick up the TV. If friends are taking part, ask each person to speak and listen from the viewer’s side.
Connect your PS5 to OBS
A capture card brings the console’s picture into your computer. OBS is where you add your voice, webcam and layout, then send the finished stream to a platform or StreamVi.
For an external USB card with HDMI passthrough, the connections look like this:
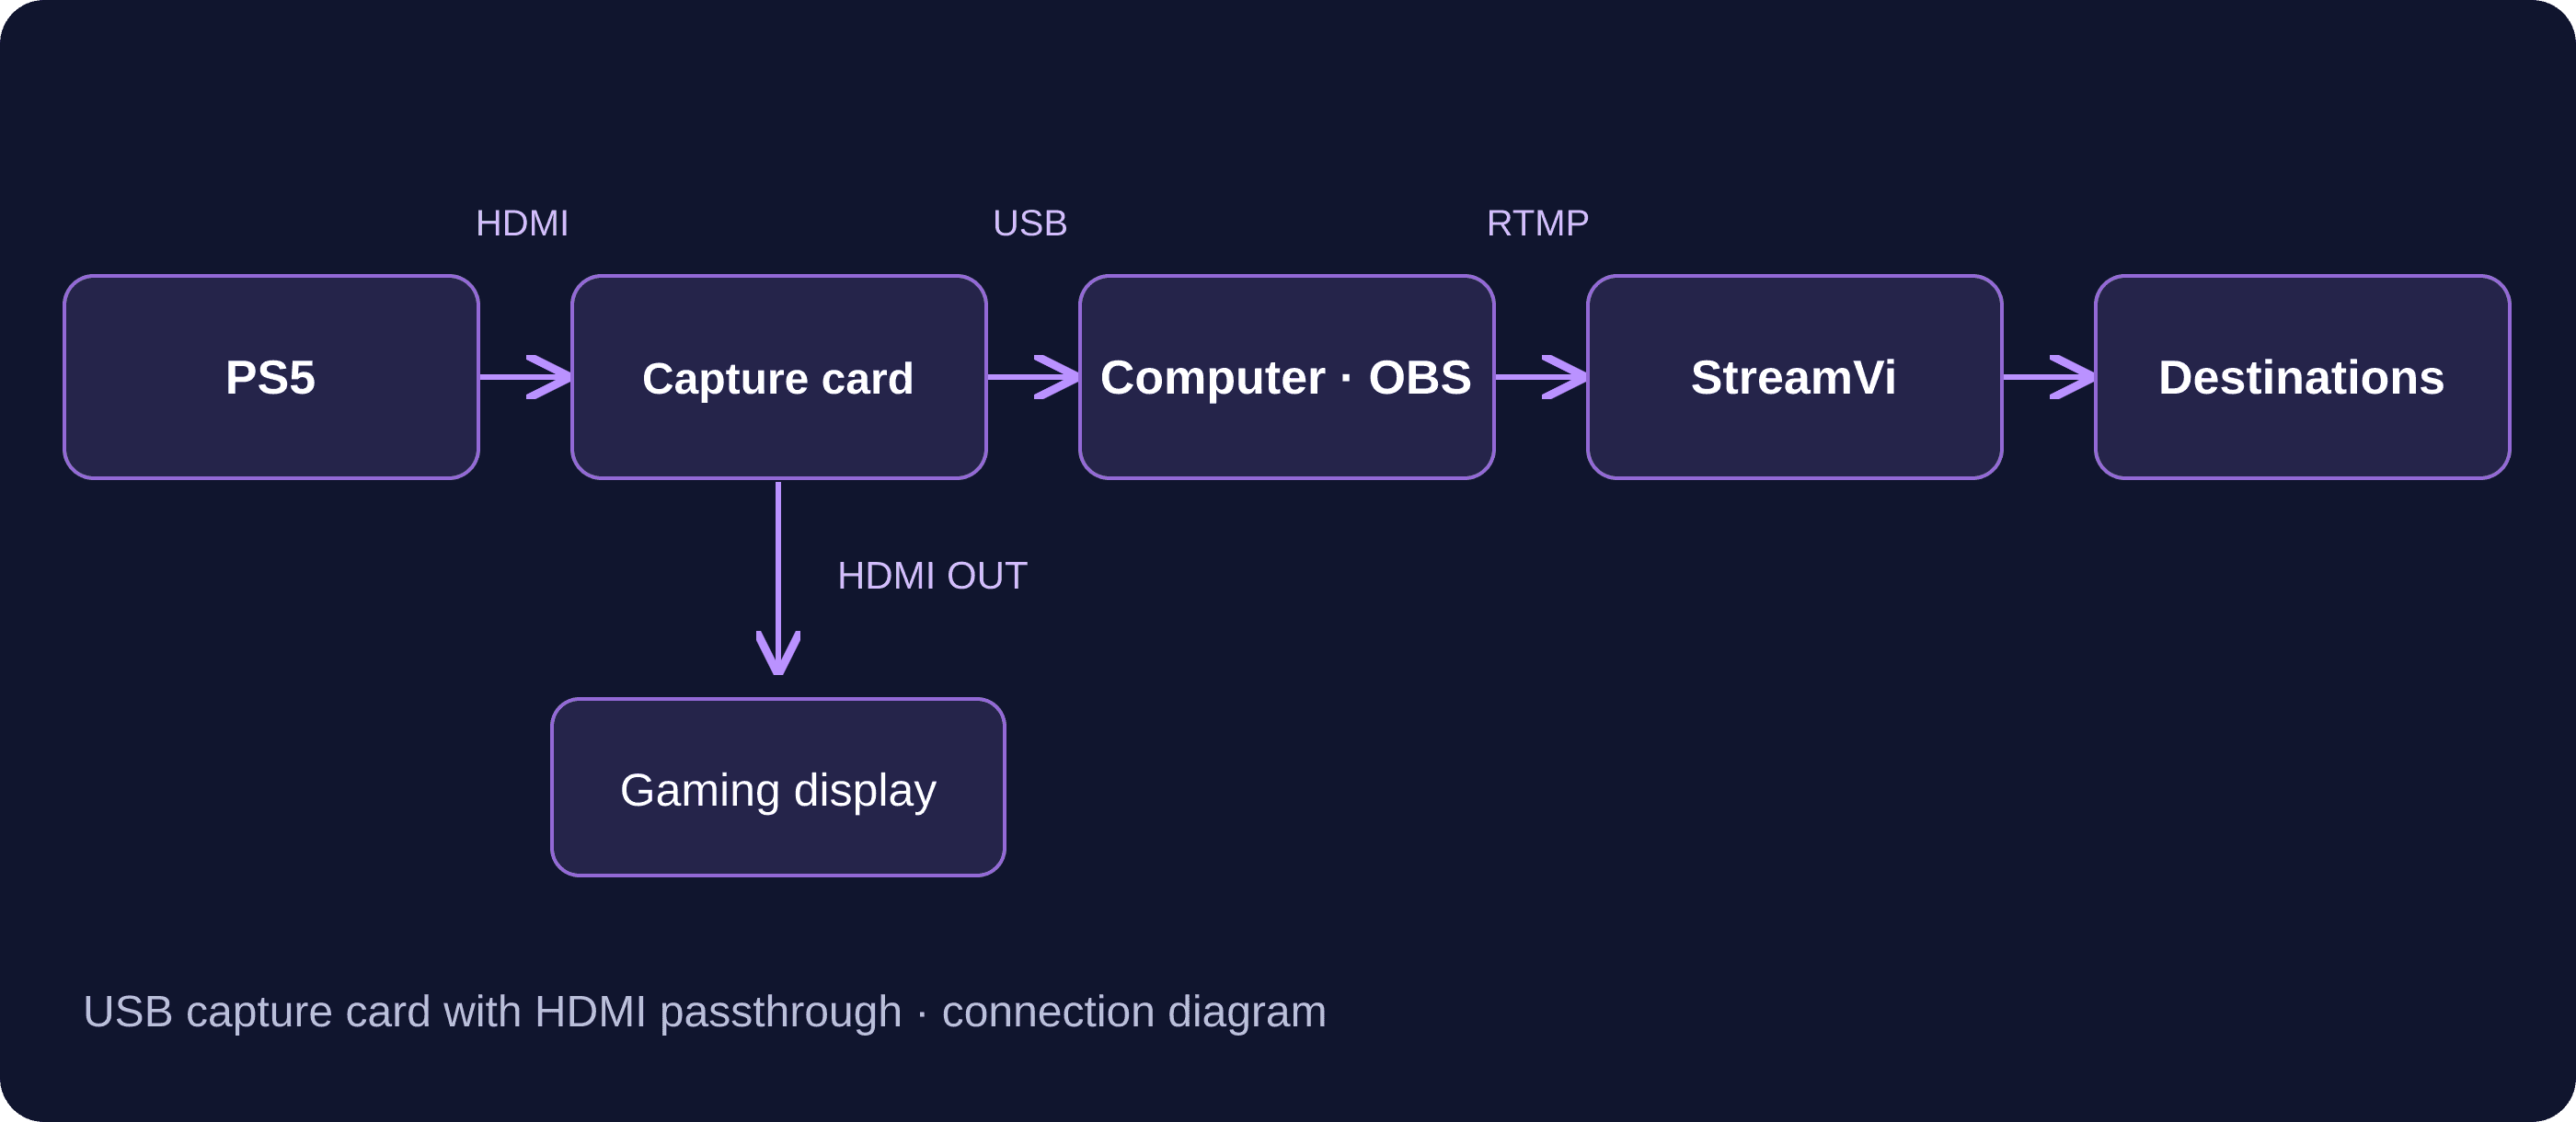
Play on the display connected to the card’s HDMI OUT. The OBS preview may have a noticeable delay.
Before buying a card, check its actual capture resolution and frame rate, plus the computer requirements. A “4K” label does not always describe what it can record. Check HDR and VRR support too if you want to keep those features on your gaming display. Capture-card manufacturer Elgato provides a PS5 setup guide for its 4K X.
- With PS5 connected directly to the TV, open Settings → System → HDMI and turn off Enable HDCP. Otherwise the capture card may show a black screen. Protected media apps may need HDCP turned back on later. More on HDCP.
- Connect the console’s HDMI OUT to the card’s HDMI IN, and the card’s HDMI OUT to your display. Connect the card to a suitable USB port on the computer.
- Add a Video Capture Device source in OBS and select the card. Close any other application using it. Choose a supported video mode; SDR at 1080p30 is a useful starting point for a first test.
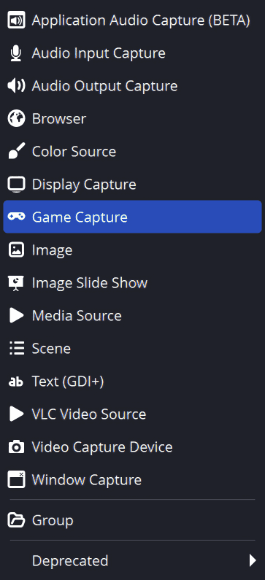
Screenshot from the OBS guide. Choose Video Capture Device for the card.
Get the game and your voice sounding right
Make a short OBS recording: play for a moment, talk over the action, then let a friend speak in party chat. Listen back. Your voice should remain easy to follow when the game gets loud.
If you hear the game in your headset but the recording is silent, check the PS5’s audio output. A headset can take audio away from the HDMI connection the card is listening to. For a simple HDMI setup, start with HDMI output and stereo Linear PCM. Elgato’s missing-audio guide covers this PS5 headset issue. For a card from another manufacturer, check its instructions too.
Connect a microphone to the computer and select it in OBS for commentary. A headset mic working in your PS5 party does not automatically become an OBS input. Keeping a wired headset connected to the controller may require a compatible audio connection such as Chat Link to feed its sound into the card. Your own voice still needs a separate capture path in OBS.
For an echo, mute the stream player on the computer and turn off TV speakers first. Then check whether the same mic is active both globally and as a separate source. OBS explains that duplication problem. Monitored audio should not loop back into desktop capture either.
Share the playthrough on more than one platform
Some viewers may be waiting for GTA VI on YouTube while others follow you on Twitch. StreamVi can deliver the same broadcast to both: PS5 → capture card → OBS → StreamVi → destinations. OBS builds and encodes the stream; StreamVi distributes it to connected channels. Our multistreaming guide explains the idea in more detail.
Once your OBS recording looks and sounds right, connect the destinations:
- Add your channels to a StreamVi project using the destination guides. Check that your restream plan supports the number of simultaneous channels and your bitrate. These documentation pages are in Russian.
- Open the RTMP/server-key panel on the StreamVi project’s home screen. In OBS, go to Settings → Stream, choose Custom, and enter the StreamVi server address and project key. See the OBS connection guide, in Russian.
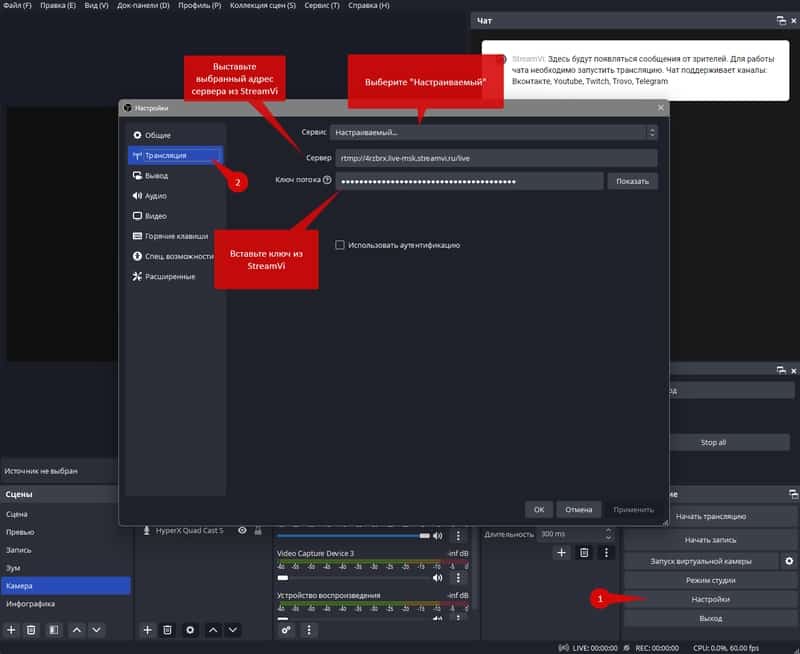
Use your own StreamVi project values. The OBS connection to StreamVi needs the StreamVi key, not a destination platform’s key.
- Enable your channels in StreamVi and start streaming in OBS. Open every destination’s viewer page; some platforms require a separate go-live step. See StreamVi’s start/stop guide, in Russian.
In OBS output settings, choose an H.264 encoder your computer supports, then match quality and bitrate to the platforms’ requirements. If destinations need different settings, StreamVi offers separate transcoding.
For Twitch, check the simulcasting guidelines. Keep combined chat in your own workspace rather than displaying it over the game while you review the rules.
When something goes wrong
| Problem | What to check |
|---|---|
| PS5 stays on “preparing” | Linked account, permission to go live and any platform requirement for two-factor authentication |
| Capture card shows a black screen | HDCP, HDMI IN/OUT direction and supported video mode. Start by checking PS5 directly on the TV |
| Game audio reaches the headset but not OBS | PS5 output routing and the card’s selected audio input: HDMI or analog |
| Voice is doubled | Duplicate mic source, captured monitoring audio or an unmuted stream player |
| One destination stays offline | Channel switch, authorization, key and any separate platform start step |
| Recording is smooth but the stream stalls | Upload connection and bitrate. Pause background downloads and retry at lower quality |
Change one setting at a time so you can tell which fix helped.
Your GTA VI launch-night checklist
While you wait for release, rehearse with another game using the same mic, headset and connections. A few minutes now can save a last-minute search for the right cable.
- Choose the kind of playthrough you want: spoiler-free discovery, letting chat help pick the route, or taking time to explore. Prepare the title and chat rules.
- Watch the test on a phone with headphones. Check small text, game audio, your voice and your friends. Set visibility beforehand if the test should not be public.
- Review the platforms’ music rules. In-game radio may include tracks that require separate permission to broadcast.
- Save the working settings. After GTA VI launches, run another short test in the game itself. Check audio and capture; built-in console broadcasts may hide some game scenes.
Have chat and your viewer link ready before you start. Then pick up the controller and explore GTA VI’s world with your audience.
